Tuesday, November 29, 2022

Bob Ross returns

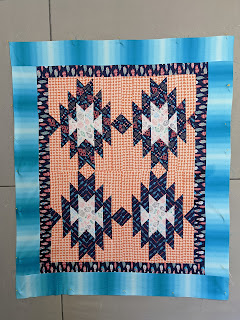
   I don't recall how I learn of some quilt contests I participate in. Typically, it's a call for participants that are shared via Facebook these days. I suppose I learned of the Cherrywood Challenge from a couple different directions. In any event, I participated in the Bob Ross Challenge that was for 2019. I was shocked to learn I won first place.

 I was joyfully looking forward to getting a boost in my "career" from being part of it and winning 1st place. I didn't get any boost. They never used my quilt in any advertisements of their shows in any social media. I have no idea why.

 Because of Covid, what was supposed to travel for a year stretched to 3 years. They never really asked if they could keep the works, instead just sort of informed us. The last communication I saw was it would be returned in January, but suddenly, it just showed up in November when I was least expecting it. 

 Of course they have moved on to 2 other challenges since and one I got in and one I did not. At this point, the price of participating, the number of people participating while the exhibit numbers remain the same, means the odds against you are growing. There's a point that you must weigh if it's worth it or not. 

It's all making me rethink my place at this point. I'm getting older and I have achieved a lot of goals I've set over time. Despite the obstacles in my way. Maybe it's my way of looking at the world, but I am not interested in pay to play. It's always the artist that pays for the opportunity to share their vision with the world. 

 This week, Bob Ross returned home and the ribbon came with it. Nothing else. Not even a thank you letter. My husband looked at it and said, "I thought your piece was a portrait of Bob Ross." So, apparently no one really looks at what art I make. I don't know what to make of that.  

Thursday, March 17, 2022

PQ 13-6 Flying Geese


 Flying Geese Fish


It's all a bit Fishy
19.5 x19.5

Let's talk about it

The challenge was to make at least 4 flying geese patches.
 EDIT: Somehow I missed that it needed to be 5 flying geese. I swear I saw 4 earlier. Anyway- I made a label from one, so my total is 5.
  Now let's Carry On: 
 Flying geese are a way to make a triangle that, when they are put together in a line, looks like geese are flying in the sky. Of course, you don't have to make them look like geese or put them in a line. I decided I would use them to make the front of my fish. The fish are made with a flying geese patch, a solid patch and an hourglass patch. I appliqued the eyes on them and I really Love these fish! I like how silly they look. 
  It reminded me of an old camp song I used to sing in Girl Scouts. I looked it up on the internet and discovered that there are a myriad of verses and a myriad of variations to those verses. Of course, I was talking to my husband (who was a 4-H er) and he had never heard of it. So, you might have heard this song, heard a variation or never heard of it at all. BUT-
  I was hearing a story about a Vice Principal who read a story to the school and it was a humorous book about Butts. Now, I am not familiar with that particular book, but I have raised a child who continues to think Farts are the funniest thing ever ( and she is 25), So I am familiar with those student readers who would find it endlessly funny. They fired him for reading that book.
  But then I remember this song- and several verses and they all speak to a questionable activity that adults do not approve of talking about.  I suppose you could say that these camp songs were as much a part of my childhood as all the church songs I sang. In the 60's and 70's all of this was considered wholesome fun and I'd like to think I grew up to be a good citizen. (Didn't hurt me none) 
  If I had time and was a bigger piece, I would have made the words from fabric. But, since it was small and I'm back to work- It was iron-on vinyl to the rescue. 
  Speaking of Work- We are back!!! Opening day was Wednesday and it was CRAZY. So many people on spring break and so excited to visit. My Parasols are still "in Transit" so I worked in the fudge area and made a ton of popcorn and some caramel apples. I'll be happy when those Parasols come in for sure. 
 I'm thrilled to have completed another year of Project Quilting (I missed challenge 1 this year) and I had a really good time. Thanks for another great season!


Thursday, March 3, 2022

PQ13-5 Rhythm and Repetition


 Thinking about Spring

Gnomes in the Garden  25" x 25"

OMG! How ridiculous  was my effort this week! The theme of Rhythm and Repetition is something that is so ubiquitous in the quilt world that it's an automatic GIVEN that a quilter would intimately know and often use these elements of art. Basically, it left the challenge so wide open, it was hard to lock down into something. My mind floundered from thought to thought until I was a scattered mess. Somehow I got fixated on the 6" gnome block (really cute!) and added some Cricut Cut flowers and mushrooms. All cute elements I think and worth doing something like it again. Maybe the 12" gnome will be in my future. 

 I've been trying to get a big jump on my quilt guild project of a bookcase quilt, so that's been taking my focus. It's a lovely project for the ice storm days we had. I literally did not go outside for a week. I finally did to get my eyes checked. New Glasses are in my future (7-10 days?) but my eyes are getting old, but not old enough yet. LOL Blurry vision is going to be my companion for awhile. Very disappointing. I didn't realize my "eyeballing" the mushrooms ended up not precise. I'll remember to do more measuring next time. 

Another bit of disappointment is that while some of the Cherrywood Challenge will be at the AQA show in Branson in March, my quilt is not in the right collection, so the locals will continue to not know I exist as a quilter. My collection will be in Missouri later at Missouri Star Quilt Co gallery and I'll try to get there during that time. 

My time away from the world is coming to a close. I start back to work on Monday if the weather allows. I don't know exactly what I'll find when I get there. Mostly cleaning I'm sure at first. I dream we have an elevator. LOL 


Wednesday, February 16, 2022

Project Quilting 13-4 Mining for Diamonds

Mining For Diamonds

You can look at this challenge many different ways, but my approach began by mining my stash for this group of fat Quarters in which one print was diamonds. The rest of the group was themed American Indian type designs. I'm not sure how the designer put Diamonds and Indians together, but there you go. So looking on the web, I found a technique that sounded interesting. 
  Basically, you start with a square, sew a border around it and Triangles in the corners. Then you cut that down the middle and each side into 4 sections. (8 in all) then (and here's the magic) you flip each strip and sew it together like that. 


Progress photo showing the original panel and cut and flipped to sew together.

One thing I did NOT do and it was suggested to do is starch heavily. I soon learned why, those pieces wiggled and wobbled every which way and each added border just compounded it. In the end, I have a very distorted small quilt. 

I am disappointed in my execution and not sure if I want to finish it. Should I get a different batting than I usually use to disguise some of my mistakes? Should I even bother to waste any more fabric (backing) and time to complete it since it is so wonky? 


12" x 7" Mug rug

My solution was to make a small version and starch the Heck out of it to see if that helped. Of course limited amounts left of the diamond and coordinating fabrics but I ended up with a mug rug. Because it was smaller, I made 6 cuts not 8. It still turned out interesting and starch made a big difference.  It's such a simple way to make a complex looking design IF you remember to starch. 

This is my first mug rug but I think it goes well with the coffee cup in our collection from the Cherokee Nation.  

Lessons learned:

I already said that starch is the answer to many of my problems so that's a given. While these blocks create an interesting secondary pattern when sewn together as I did, I lost some points, lost matching up seams so those are things to look out for. I really wanted to make these as a stripe with a lot of negative space to make the quilt. I think I would do that the next time. Not to mention the entire quilt was created on the Fat quarter's colorways, which wasn't easy to find coordinating fabric in my stash. I don't even know how I ended up with these FQ to begin with. I ended up using the gray in the mug rug because it was the only piece I hadn't used and had enough of to complete the smaller piece. 

All in all, I tried something new- failed miserably and redeemed myself with a smaller piece. I might try it again someday. 


Tuesday, February 1, 2022

Project Quilting 13-3 Kitchen Influence

 Kitchen Influence

I have fond memories of apple butter from my Grandmother's house. 
While she grew up in Pennsylvania, I grew up in Florida. Apples only made an appearance in the toe of my Christmas stocking. I found Apple butter to be quite a treat on buttered bread. She lived next door to me and, while we had several types of jelly and preserves at our house, only Grandma had Apple butter. 
Fast Forward to now and Silver Dollar City sells apple butter. I bought some and it was different from what I knew- it had a more jelled consistency. Not what I remembered. My shop also makes caramel apples. Sometimes the apples would be bruised and we would take them home. I made fried apples and apple crisp and then one day, I decided to look into making apple butter in a crock pot. 
Now, these apples are green ones and quite tart, but it makes for an apple butter that is quite yummy to me. I've made a few batches and have shared. 
Apple Butter
7.5" x 10"

Let's Learn as we go!

I've never made an envelope quilt finish before. I am considering doing it for a bigger piece, so this was a perfect opportunity to try it out. I was using lots of scrap pieces of all fabrics for this piece and the batting was part of a sample packet. 
I sewed the backing to the front with the batting inside, leaving a 3" space to turn it. I poked out all the corners, turned under the edges of the opening and pinned it shut. 
I did all the quilting after it was turned and pressed right side out. 
My sewing machine has some "quilting stitches" that I never really tried using because they seem VERY small. In this case, since the piece was so small, I think it worked. I kept black thread in the bobbin so I could see how the stitches looked on both sides. In the end, after I did the jar and apples, I went back to free motion quilting. I used red, black, brown and blue threads in the top. 

What did I learn?

I learned that I had curving of the overall piece that I won't like in a bigger one. I'm not sure if I can adjust it by blocking it, but I'm sure that I will probably bind my other piece like I usually do. It's not worth all that work to not get a good final result. 
I learned that I probably will not use those pre programed quilt stitches for a larger piece. It is so dense and would take too long. 

Yes or No

There's a lot I like about this piece. I like how painterly it looks and how imperfect it is. I liked the collage approach to the apples and how the red thread brought it all together. I like how the background fabric reminds me of an old tablecloth and a bit old fashioned in a way. 
I like that I used up scraps (although I might have had different reds in the apples if I wasn't using just random scraps I dug out.) 
What I don't like is that I didn't keep it squared up and I'm not sure how to fix it so I don't end up with pointy corners and curvy sides, especially with a bigger piece. 

Friday, January 21, 2022

PQ 13-2 In Silhouette

Joy
8"x 10"
Lessons Spark Joy
Sometimes things that don't work
perfectly can spark a difference.

A while ago, I had explored making pieces based on Seminole Piecing from a book I picked up from the local guild. I played around with the green patterned fabric and discovered that there was a good reason why this technique is done with solids and not patterned fabrics. I also wasn't very precise in my piecing. But, there they were, strips in my stash of half made items. 
I still had some of that green fabric as well so I echoed it's presence with a strip. 
I'm also playing with the black with colored Fabrics placed strategically behind the cut outs with the flowers and bird. While I explored some brighter colors, I decided on a cream color. It worked well enough that I like that approach. It will be a technique I'll use again.
I cut my bird piece and the loopy border for the green fabric using a Cricut Maker. This is the sort of thing I purchased the Maker for because it has the option of a rotary blade which makes a big difference cutting fabric. 
I've been exploring different techniques to make a cut on my Cricut successful. I've got several techniques under my belt now and this went fairly quickly. 

My focus this winter has been working on a couple contest quilts. I missed the first Project Quilting challenge this year because I was in angst about another piece. I had started a piece and it didn't work in the end and I started over with a different vision. We often do that, don't we?- Plan B. I like my plan B better. 
 One more contest quilt looms and I'm still bouncing ideas from one extreme to another. 
The weather has been cold, a bit icy/ snowy and I am thankful I have no need to go anywhere.