Wednesday, February 16, 2022

Project Quilting 13-4 Mining for Diamonds

Mining For Diamonds

You can look at this challenge many different ways, but my approach began by mining my stash for this group of fat Quarters in which one print was diamonds. The rest of the group was themed American Indian type designs. I'm not sure how the designer put Diamonds and Indians together, but there you go. So looking on the web, I found a technique that sounded interesting. 
  Basically, you start with a square, sew a border around it and Triangles in the corners. Then you cut that down the middle and each side into 4 sections. (8 in all) then (and here's the magic) you flip each strip and sew it together like that. 


Progress photo showing the original panel and cut and flipped to sew together.

One thing I did NOT do and it was suggested to do is starch heavily. I soon learned why, those pieces wiggled and wobbled every which way and each added border just compounded it. In the end, I have a very distorted small quilt. 

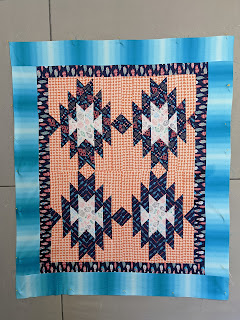
I am disappointed in my execution and not sure if I want to finish it. Should I get a different batting than I usually use to disguise some of my mistakes? Should I even bother to waste any more fabric (backing) and time to complete it since it is so wonky? 


12" x 7" Mug rug

My solution was to make a small version and starch the Heck out of it to see if that helped. Of course limited amounts left of the diamond and coordinating fabrics but I ended up with a mug rug. Because it was smaller, I made 6 cuts not 8. It still turned out interesting and starch made a big difference.  It's such a simple way to make a complex looking design IF you remember to starch. 

This is my first mug rug but I think it goes well with the coffee cup in our collection from the Cherokee Nation.  

Lessons learned:

I already said that starch is the answer to many of my problems so that's a given. While these blocks create an interesting secondary pattern when sewn together as I did, I lost some points, lost matching up seams so those are things to look out for. I really wanted to make these as a stripe with a lot of negative space to make the quilt. I think I would do that the next time. Not to mention the entire quilt was created on the Fat quarter's colorways, which wasn't easy to find coordinating fabric in my stash. I don't even know how I ended up with these FQ to begin with. I ended up using the gray in the mug rug because it was the only piece I hadn't used and had enough of to complete the smaller piece. 

All in all, I tried something new- failed miserably and redeemed myself with a smaller piece. I might try it again someday. 


Tuesday, February 1, 2022

Project Quilting 13-3 Kitchen Influence

 Kitchen Influence

I have fond memories of apple butter from my Grandmother's house. 
While she grew up in Pennsylvania, I grew up in Florida. Apples only made an appearance in the toe of my Christmas stocking. I found Apple butter to be quite a treat on buttered bread. She lived next door to me and, while we had several types of jelly and preserves at our house, only Grandma had Apple butter. 
Fast Forward to now and Silver Dollar City sells apple butter. I bought some and it was different from what I knew- it had a more jelled consistency. Not what I remembered. My shop also makes caramel apples. Sometimes the apples would be bruised and we would take them home. I made fried apples and apple crisp and then one day, I decided to look into making apple butter in a crock pot. 
Now, these apples are green ones and quite tart, but it makes for an apple butter that is quite yummy to me. I've made a few batches and have shared. 
Apple Butter
7.5" x 10"

Let's Learn as we go!

I've never made an envelope quilt finish before. I am considering doing it for a bigger piece, so this was a perfect opportunity to try it out. I was using lots of scrap pieces of all fabrics for this piece and the batting was part of a sample packet. 
I sewed the backing to the front with the batting inside, leaving a 3" space to turn it. I poked out all the corners, turned under the edges of the opening and pinned it shut. 
I did all the quilting after it was turned and pressed right side out. 
My sewing machine has some "quilting stitches" that I never really tried using because they seem VERY small. In this case, since the piece was so small, I think it worked. I kept black thread in the bobbin so I could see how the stitches looked on both sides. In the end, after I did the jar and apples, I went back to free motion quilting. I used red, black, brown and blue threads in the top. 

What did I learn?

I learned that I had curving of the overall piece that I won't like in a bigger one. I'm not sure if I can adjust it by blocking it, but I'm sure that I will probably bind my other piece like I usually do. It's not worth all that work to not get a good final result. 
I learned that I probably will not use those pre programed quilt stitches for a larger piece. It is so dense and would take too long. 

Yes or No

There's a lot I like about this piece. I like how painterly it looks and how imperfect it is. I liked the collage approach to the apples and how the red thread brought it all together. I like how the background fabric reminds me of an old tablecloth and a bit old fashioned in a way. 
I like that I used up scraps (although I might have had different reds in the apples if I wasn't using just random scraps I dug out.) 
What I don't like is that I didn't keep it squared up and I'm not sure how to fix it so I don't end up with pointy corners and curvy sides, especially with a bigger piece.