Wednesday, February 16, 2022

Project Quilting 13-4 Mining for Diamonds

Mining For Diamonds

You can look at this challenge many different ways, but my approach began by mining my stash for this group of fat Quarters in which one print was diamonds. The rest of the group was themed American Indian type designs. I'm not sure how the designer put Diamonds and Indians together, but there you go. So looking on the web, I found a technique that sounded interesting. 
  Basically, you start with a square, sew a border around it and Triangles in the corners. Then you cut that down the middle and each side into 4 sections. (8 in all) then (and here's the magic) you flip each strip and sew it together like that. 


Progress photo showing the original panel and cut and flipped to sew together.

One thing I did NOT do and it was suggested to do is starch heavily. I soon learned why, those pieces wiggled and wobbled every which way and each added border just compounded it. In the end, I have a very distorted small quilt. 
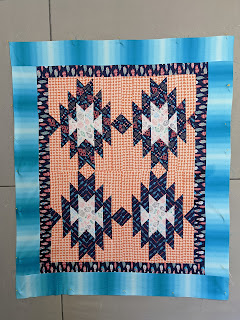
I am disappointed in my execution and not sure if I want to finish it. Should I get a different batting than I usually use to disguise some of my mistakes? Should I even bother to waste any more fabric (backing) and time to complete it since it is so wonky? 


12" x 7" Mug rug

My solution was to make a small version and starch the Heck out of it to see if that helped. Of course limited amounts left of the diamond and coordinating fabrics but I ended up with a mug rug. Because it was smaller, I made 6 cuts not 8. It still turned out interesting and starch made a big difference.  It's such a simple way to make a complex looking design IF you remember to starch. 

This is my first mug rug but I think it goes well with the coffee cup in our collection from the Cherokee Nation.  

Lessons learned:

I already said that starch is the answer to many of my problems so that's a given. While these blocks create an interesting secondary pattern when sewn together as I did, I lost some points, lost matching up seams so those are things to look out for. I really wanted to make these as a stripe with a lot of negative space to make the quilt. I think I would do that the next time. Not to mention the entire quilt was created on the Fat quarter's colorways, which wasn't easy to find coordinating fabric in my stash. I don't even know how I ended up with these FQ to begin with. I ended up using the gray in the mug rug because it was the only piece I hadn't used and had enough of to complete the smaller piece. 

All in all, I tried something new- failed miserably and redeemed myself with a smaller piece. I might try it again someday. 


Tuesday, February 1, 2022

Project Quilting 13-3 Kitchen Influence

 Kitchen Influence

I have fond memories of apple butter from my Grandmother's house. 
While she grew up in Pennsylvania, I grew up in Florida. Apples only made an appearance in the toe of my Christmas stocking. I found Apple butter to be quite a treat on buttered bread. She lived next door to me and, while we had several types of jelly and preserves at our house, only Grandma had Apple butter. 
Fast Forward to now and Silver Dollar City sells apple butter. I bought some and it was different from what I knew- it had a more jelled consistency. Not what I remembered. My shop also makes caramel apples. Sometimes the apples would be bruised and we would take them home. I made fried apples and apple crisp and then one day, I decided to look into making apple butter in a crock pot. 
Now, these apples are green ones and quite tart, but it makes for an apple butter that is quite yummy to me. I've made a few batches and have shared. 
Apple Butter
7.5" x 10"

Let's Learn as we go!

I've never made an envelope quilt finish before. I am considering doing it for a bigger piece, so this was a perfect opportunity to try it out. I was using lots of scrap pieces of all fabrics for this piece and the batting was part of a sample packet. 
I sewed the backing to the front with the batting inside, leaving a 3" space to turn it. I poked out all the corners, turned under the edges of the opening and pinned it shut. 
I did all the quilting after it was turned and pressed right side out. 
My sewing machine has some "quilting stitches" that I never really tried using because they seem VERY small. In this case, since the piece was so small, I think it worked. I kept black thread in the bobbin so I could see how the stitches looked on both sides. In the end, after I did the jar and apples, I went back to free motion quilting. I used red, black, brown and blue threads in the top. 

What did I learn?

I learned that I had curving of the overall piece that I won't like in a bigger one. I'm not sure if I can adjust it by blocking it, but I'm sure that I will probably bind my other piece like I usually do. It's not worth all that work to not get a good final result. 
I learned that I probably will not use those pre programed quilt stitches for a larger piece. It is so dense and would take too long. 

Yes or No

There's a lot I like about this piece. I like how painterly it looks and how imperfect it is. I liked the collage approach to the apples and how the red thread brought it all together. I like how the background fabric reminds me of an old tablecloth and a bit old fashioned in a way. 
I like that I used up scraps (although I might have had different reds in the apples if I wasn't using just random scraps I dug out.) 
What I don't like is that I didn't keep it squared up and I'm not sure how to fix it so I don't end up with pointy corners and curvy sides, especially with a bigger piece. 

Friday, January 21, 2022

PQ 13-2 In Silhouette

Joy
8"x 10"
Lessons Spark Joy
Sometimes things that don't work
perfectly can spark a difference.

A while ago, I had explored making pieces based on Seminole Piecing from a book I picked up from the local guild. I played around with the green patterned fabric and discovered that there was a good reason why this technique is done with solids and not patterned fabrics. I also wasn't very precise in my piecing. But, there they were, strips in my stash of half made items. 
I still had some of that green fabric as well so I echoed it's presence with a strip. 
I'm also playing with the black with colored Fabrics placed strategically behind the cut outs with the flowers and bird. While I explored some brighter colors, I decided on a cream color. It worked well enough that I like that approach. It will be a technique I'll use again.
I cut my bird piece and the loopy border for the green fabric using a Cricut Maker. This is the sort of thing I purchased the Maker for because it has the option of a rotary blade which makes a big difference cutting fabric. 
I've been exploring different techniques to make a cut on my Cricut successful. I've got several techniques under my belt now and this went fairly quickly. 

My focus this winter has been working on a couple contest quilts. I missed the first Project Quilting challenge this year because I was in angst about another piece. I had started a piece and it didn't work in the end and I started over with a different vision. We often do that, don't we?- Plan B. I like my plan B better. 
 One more contest quilt looms and I'm still bouncing ideas from one extreme to another. 
The weather has been cold, a bit icy/ snowy and I am thankful I have no need to go anywhere. 


Tuesday, March 16, 2021

Project Quilting 12-6

 Ab Intra


  For the final challenge of Project Quilting for 2021, Trish really pulled out an obscure theme. Ab Intra, which means "from Inside".  Ohhh.. I had to think about this one for a while. What represents the me inside? What image would tell you something about me and what motivates me? 
   I always Loved making art from a young age and I continued to create art in various mediums over the years. I went to college and studied Commercial art and got a degree in teaching art. I also started taking pottery classes there and, after graduating, I apprenticed myself to a potter. For years, I travelled the Southeast selling pottery art art and craft shows until I got married. In college I also took several photo classes. I learned to love the Adams approach to photography, composing in the camera instead of manipulating in the darkroom. Over the years, I've transitioned from 35 mm film to digital and all the progress digital has made. I have a small collection of cameras from different ages. My favorite came from my great uncle David. 
   Photography, in general, has aided me in my art in other mediums, increased my skills at composing, and I've even begun selling photo-based images on Spoonflower. 
     What is my favorite thing to do? I love to walk in nature. I love to photograph nature and take moments to look closely at the nature elements. I believe that we will discover much more about how trees and plants communicate with each other. (Yes I've seen the documentaries) I love the  Japanese concept of "Forest Bathing". 
  I love family history and (on top of being an artist who finds value in things many don't) I ALSO have the issue of imparting life in objects (like my great uncle's camera). It leads me to have a clutter of stuff, but they become my cocoon of love, memories, touchstones. 
  Finally, ever since I've been young, I've enjoyed what they now call Americana. I attended the local folk festival (even skipped school to do it) because I really loved the concept of saving our old ways. It might have coincided with the craft resurgence of the Bicentennial, but  I was impressionable and it has  lasted in many ways in my life. Now that I live in the Missouri Ozarks, I have continued to have the opportunity to enjoy the folkways of our forefathers. I fervently hope that after Covid is over and we open up more, Baker's Creek will have their festivals once more. My love and interest in Americana directed my desire to work at Silver Dollar City. While they have world class rides, the overall theme of the park in old times and that means that I wear a long dress, pantaloons, and knee socks every day to work (even the summer). Most of the fabric our dresses are made of comes from Marshall Dry Goods in Batesville, Ar. The costume shop would have a sale of left overs every year (before covid) and it worked out to $1 a yard. Whenever I found fabric that matched my dress, I would be excited. It came in handy when I had to wear masks for covid. I could match my dresses. This year, they gave me enough to make matching masks for my new dresses. 
  I also sit next to the Dulcimer shop and, after 10 years, I finally found my perfect one and bought it. I had an old one from my early 20's but this one is SO nice! I have been practicing to play it better ever since. 

Capturing Me

18" x 14.5

   This depicts my love of taking photos of nature. In the lenses the fabrics are taken from a photo I have in Spoonflower that shows my neighborhood at sunset. (lakes and mountains) It shows my love of having family objects around me. It shows my love of music and the final border is from the fabric my dresses from work are made from. 

Monday, March 1, 2021

Project Quilting 12-5 Crazy Quilting

 Crazy Quilted Heart

Set it Free

6" x 3"


This week the challenge is Crazy Quilting. Another technique challenge, although I suppose anything that would make you "Crazy" would qualify. Crazy Quilting is, traditionally, a way of showing off your luxury fabrics (such as velvets, satins, lace, etc) AND your impressive skills at embroidery stitching, both on the joining of the fabrics and feature elements. I might have dug out some fabrics that qualified, but I wasn't in the mood. In addition, I'm not into hand stitching so I used the fancy stiches on my machine. 
  I'm in the process of making a piece I might submit to a show, so I had these fabrics laying around. I like the idea of making a heart without any nod to traditional colors. In the spirit of crazy quilting, I added yarn and beads and the butterfly made from a thin felt. It's actually from a piece I picked up from work. Life is Good hats are sent with these felt pieces to hold a shape of the hat but customers pull them out, they end up on the floor, and I gather them up. 
  I used a Sizzix cutter (I have one plate to make butterflies) To cut the butterfly. I also used this felt as a foundation for the fabrics and sewing the stitches. I then added the yarn and beads (xo for love and kisses) and then stitched the entire thing to black felt. After I took the picture on my design wall, I added a pinback so I could wear it. 
  My husband said this reminded him of that saying in the 60's/70's that said:

"If you Love something, set it free.

If it comes back, it's yours, if it doesn't, it never was." 


So, here it is pinned onto a jean jacket. 

Wednesday, February 17, 2021

Project Quilting 12-4 Snail Trail block

 We have Snow! 

I've been looking out the window a lot this week. I'm not a big fan of cold, but I like when there's snow on the ground. So, as I finished up my quilt today, this is the accumulation of the snow... so far... it's still snowing here. It's a fine snow, so it's taken quite a while for it to pile up around here. It's fun looking out this window and remember all the years my kids would be out there playing and sledding. Such wonderful memories. If I get motivated, I'll take a walk to the Lake and take some pictures there. It's been a while since we have gotten this much snow and our lake is so deep it doesn't freeze. Anyway, onto the challenge...

The Cats are Cold

25" x25"

I had done a snail trail block a few times in the past so I was familiar with it but I was adamant I was NOT going to make a bigger quilt this time. Still, snail trail lends itself to the best impact being repeated in several blocks... But I really didn't want to make a big quilt. I found this one on Pinterest which uses just one snail trail for it's tails and then simple blocks for the rest of the cats. It seemed like something I could sketch out easily. I saw it made both like this and with a snowballed corner on the cat body. I liked keeping it more geometric. 
Every source I looked at for making a 12" BLOCK, gave different cutting instructions. I decided to make an 8" BLOCK and cut the pieces , 5 1/4", 3 3/4", 3', and 2", then sub cut the first 3 into half squares on the diagonal.
I practiced, and started on my precious Cherrywood fabric. These cats are using some fabric from the  "Alaskan Sunset" collection. I liked the humor of using that in the week of sub freezing temperatures. 
Both of my girls, who are living on their own, decided to own cats. We have had cats while they were growing up, but now we have the two dogs and no cats after ours have passed away from old age. So, it's a tribute to Psyche, Bob, Luke and Star. Maura's Luke is quite the scene stealer in her Zoom classroom. Cats are fun.  

So, what did I learn this time? I am usually clueless about quilting. This week, I became a bit more adventurous about free motion quilting. I gave myself permission to play and not be perfect. I also tried sewing a binding on totally by machine. I sewed it on the back and flipped to the front and I used a foot called a piecing foot guide which kept my stitches running right along the edge. I was mostly pleased with that experiment too. 
I had some thread breakage. I noticed when I went to block the piece, the water evaporated quickly. I'm wondering if the humidity was affecting my thread.. or if it's just too old? Maybe I should just get rid of it? Not sure. 
Calling this challenge done and happy with what I've learned. 

Friday, February 5, 2021

Project Quilting 12-3 Virtual Vacation

 Virtual Vacation

It's cold in the winter here and, unlike last year with it's spectacular sunrises, this has been gray (oh so gray) with few actual snowfalls to brighten up the place. I would normally think about a trip, but Covid has squashed that thought. I just need to be happy snuggled up in my house with my quilt making. The theme this week made me remember a couple years ago when I was able to spend a couple weeks at the beach in the Emerald Coast of Florida. Destin and Pensacola area, where the beaches are sugar sand and every day was a different version of a beach paradise. Sigh! I photographed so much and I have so many spectacular views of that area, I decided to upload them to Spoonflower and have them printed. I wanted to work in some of the proofs I made as well. 

 My shop is called  "Elijahbluewallacestudio" 


Gold Coast Dreams 
44.5" x 40.5" 
I used a larger print of a sunset and then added in a few smaller pieces of proofs and colorful fabrics. The darker fabric I used looked informally woven and I liked how it made the brighter pieces pop. 
A closeup of the pieces show some of the different sizes of the Pensacola Beach sign I had printed. This is the vintage sign, which they recently replaced. It was so well loved, the new one really mimics the old one in design. Then, of course we ALL have scraps of fabrics around and they just seem to multiply. You would think this project might have gotten rid of a lot, but no... still a bin full. 
  Quilting (my nemesis) Continues to frustrate me. I used a pastel thread for the whole piece, mimicking the cloud lines in the sky and then carrying that down onto the sand area. The borders are all stitched a simple back and forth (wiggly at times) in different directions, crossed in the corners. 
  I'm seeing a trend this year of making basically a baby quilt sized quilt every time so far and I am pushed to finish in time. I like how I was able to use some of my spoonflower proofs. I don't know why I'm making this size this year. 
  I was talking with my daughter the other day and I mentioned just how much PQ has started to influence my fabric choices. Opening my eyes to a different esthetic for sure. 

Now for a totally off topic bit-
One day this week, I had to go out and mail off packages (including the cherrywood challenge) and I decided to get my hair cut. I was able to get an appointment fairly easily and I walked in and tried to explain what was going on with my hair.  The simple truth is that I shed hair. A lot. All the time. Everywhere. Then I also grow hair, constantly losing and growing. I am not a fussy person and I gave up with styling it a long time ago. Thus, I usually just washed my hair, then put it in a ponytail or sometimes braided it and let it go. That meant that when I was shedding hair, it was a very long piece of hair. So I had layers of length from 3 ft to about 4 or 5 inches, depending on the stage of growth. So anyway, my only instruction was to try to make it look better. So, quite a bit of the length is now gone, it's layered to work in the new growth and the bangs are also part of that. 
  My husband's first comment was to ask me why my hair looked like platinum blond . I had to laugh at him. Didn't notice that literally feet of hair was missing, it was just whiter. So, there you go. My gray shows up more. Other than my husband, there's really no one else to see it except at an occasional trip to the grocery store. I'm sure no one there really cares.